
There are many villa basements around us, and many people choose to install fish tanks in their basements—a type of sunken fish tank. Not only are these tanks exceptionally beautiful, but they also don’t obstruct natural light, significantly enhancing the aesthetic appeal of the entire basement and home. Below, I’ll outline our process for constructing villa basement fish tanks and share some important considerations.
1. First, determine the aquarium size based on the basement skylight dimensions. Typically, we recommend using half or the entire skylight area for the aquarium. This approach ensures the aquarium doesn’t block natural light while bringing stunning ocean views to the basement. Of course, this should also align with the basement’s intended use.

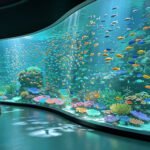
Basement Acrylic Fish Tank
2. After determining the dimensions, decide on the fish species—saltwater, freshwater, tropical, etc. Then select the acrylic sheet thickness based on the tank size. Larger tanks require thicker sheets. Once the fish species, dimensions, and acrylic thickness are finalized, proceed to drafting the blueprint with millimeter-level precision.
3. Construction follows the blueprint, primarily involving concrete work. This requires pre-planning water pipe routing, embedding conduits, and reserving acrylic slots—all preparatory steps for installing the acrylic panels. After concrete placement, waterproofing must be applied to all background sections of the aquarium to prevent leaks.

Basement Arowana Acrylic Aquarium
4. Concurrently, the factory manufactures the acrylic panels, a process estimated to take 25 to 30 days. Upon completion, the panels are transported to the installation site. On-site operations include crane lifting, installation by workers, waterproofing, acrylic polishing, and a series of related tasks.
5. Finally, the filtration system is installed and commissioned. All equipment is powered up, and the aquarium is filled with water for testing. This process typically takes three to five days.


Request a Quote